
If you have been living under a rock for the past few weeks, you might have missed this. Otherwise, you realize this is the talk of the town. In this article, I will discuss why you should set this up, as well as how you can go about doing it.
Amazon has become a target, that much is clear. Hackers are working to break into sellers’ accounts because of the massive amounts of money that 3P sellers are generating. This makes a nice, juicy target for the hackers.
Recently, one of our really good friends had his account hacked. During this event, his account was suspended and his payment was re-routed to another bank account. He lost $60,000 and several days’ worth of sales. While Amazon did work with him to get his account restored and reimbursed for the funds lost, it was a major setback for his business. As sellers, our goal is to sell products, not to be sidelined by problems like this.
There is some great news though!
Amazon is aware of what’s going on and has put a counter-measure in place to help prevent the issue.
Here are the steps for setting up two-step verification:
Step 1: Log on to your Seller Central account.
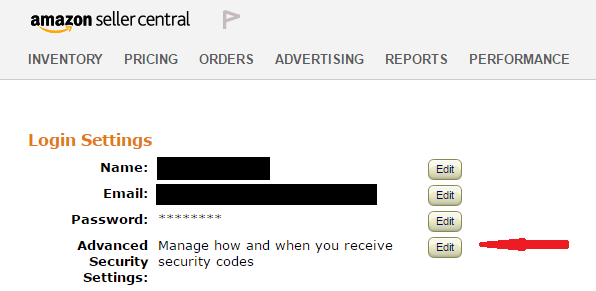
Step 2: Click on Settings in the upper right-hand corner of Seller Central and scroll down to “Login Settings”

Step 3: Once you are in Login Settings, you have to set up “Advanced Security Settings”.
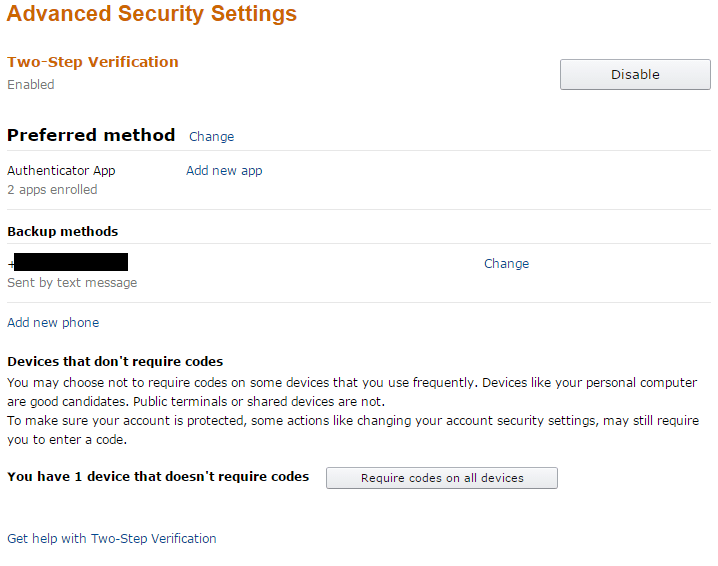
Step 4: You can choose your suggested methods for setting this up. Our suggestion is to use a 3P Authentication software e.g. Authenticator app (with iPhone), or Google Authenticator (with Android).
We chose to do text with our second verification and would suggest that as the second source.
Step 5: Double-check your bank information and notification email addresses.
It is very important that you check this information, as hackers may have already infiltrated your account and re-routed funds (by changing the notification email address). You can do that by going to:
Settings > Notification Preferences -then scroll down to “Account Notifications”

This will ensure that your notifications, which tell you about changes with your account, are headed to the correct email address. If this had been changed, you would not have received notifications, and should review all other aspects of your account, and alert Amazon immediately!
To review your banking information to make sure that it is going to the correct account, please do the following:
Settings > Account Info
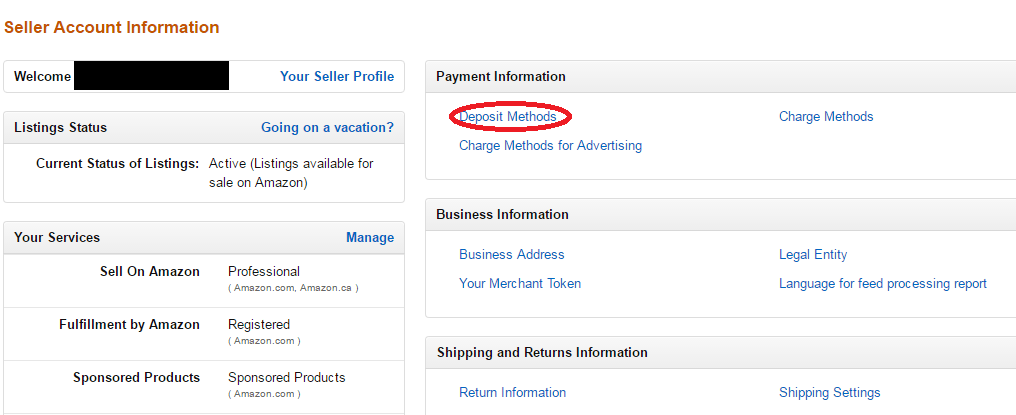
Then, click on Deposit Methods and it will bring you to the following screen:

Click “View details”, then you should see your account information! If it does not match what you had, you should change it immediately and alert Amazon.
While it is very clear that two-step verification is a necessity in the new world, where Amazon and Amazon sellers are targets, we were very hesitant to set this up initially. Our initial concern was, where we have multiple employees who access our account on a daily basis, the process would be too annoying and worth the risk.
That could not be further from the truth.
Amazon has built flexibility into the system, and it isn’t an issue to have multiple Authenticators registered. Similarly, one of our mastermind members suggested that we create “User Permissions” accounts for each employee who had access to our account. This not only allows us to reduce the number of connections to our account and prevent possible input errors with the two-step verification but also makes the process much easier if we have to terminate an employee, as we can simply remove their access.
All in all, two-step verification is a must. I hope that reading this article not only teaches you how to do it (if you have not already) but also stresses the ease and importance of getting it done.
Protect yourselves and sell lots of amazing products!